
Thanks to this most inspiring book, which has arrived in my life.
“Fashions of the Gilded Age” by Frances Grimble.
http://www.amazon.co.uk/Fashions-Gilded-Age-Volume-Undergarments/dp/0963651757
“The Dimity Bustle”

“Drafting”
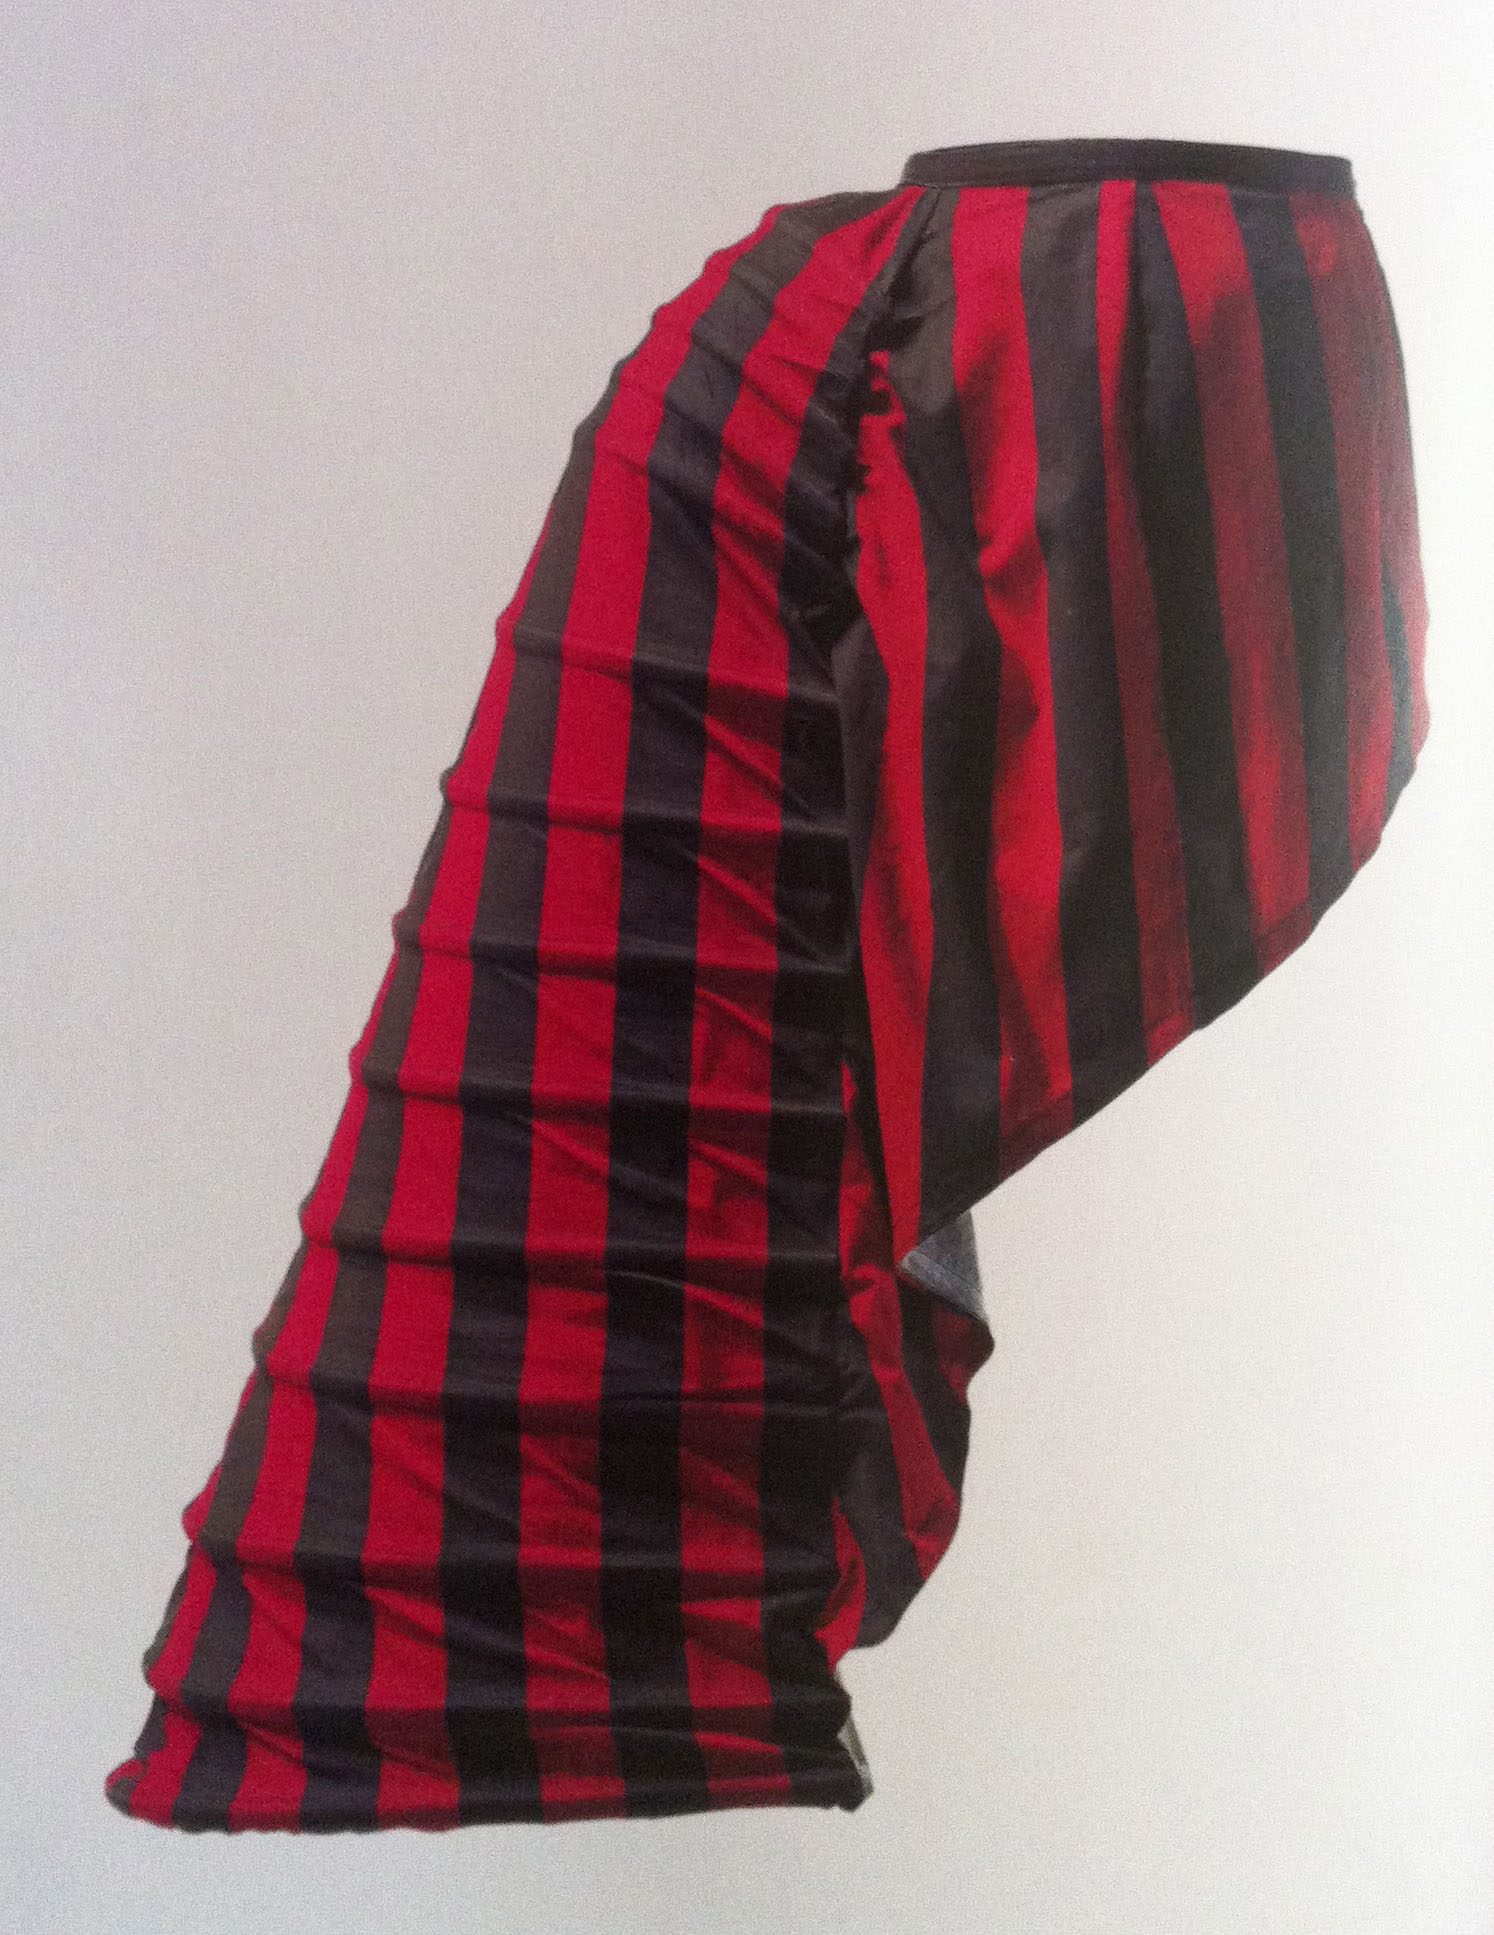
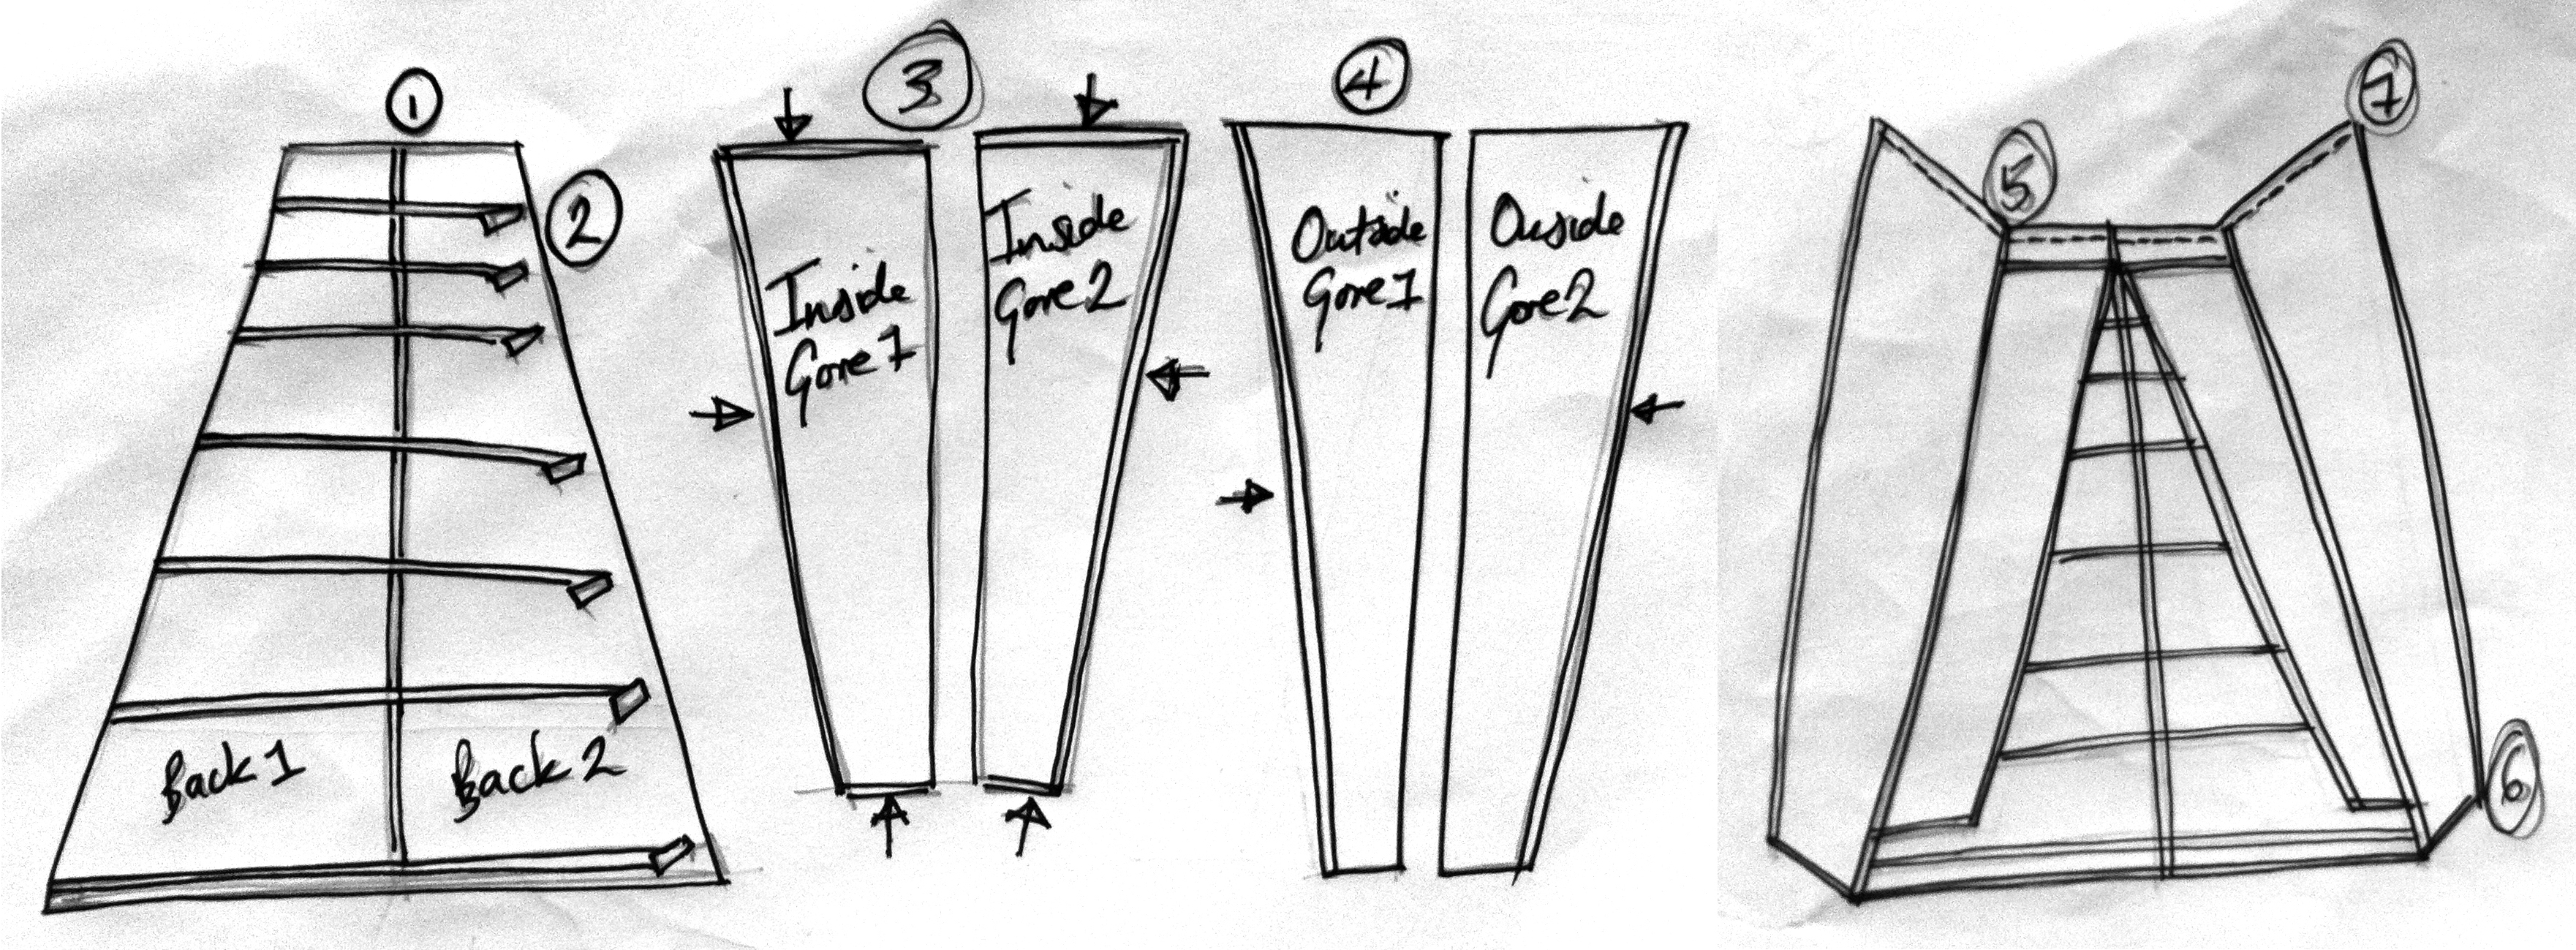
The drafting for this book uses a special scale system, which I admit took a while to get my head around, but for this particular pattern its at a 1/4 scale. So using Abobe Illustrator I drafted this out by measuring the book and then x4, I printed out onto A3 and joined together. This would be easily drafted by hand by drawing the downward measurement at 1st: book=189mm x 4=759mm. Parallel at the top 2nd: Waist book=31.5mm x 4=126mm. Then parallel at the bottom 3rd: bottom Hem book= 67mm x 4=268mm. So by joining up these the slopping back angel is achieved. Measure down for the bone channels and mark horizontally. Then you just apply this technique to the side panel.

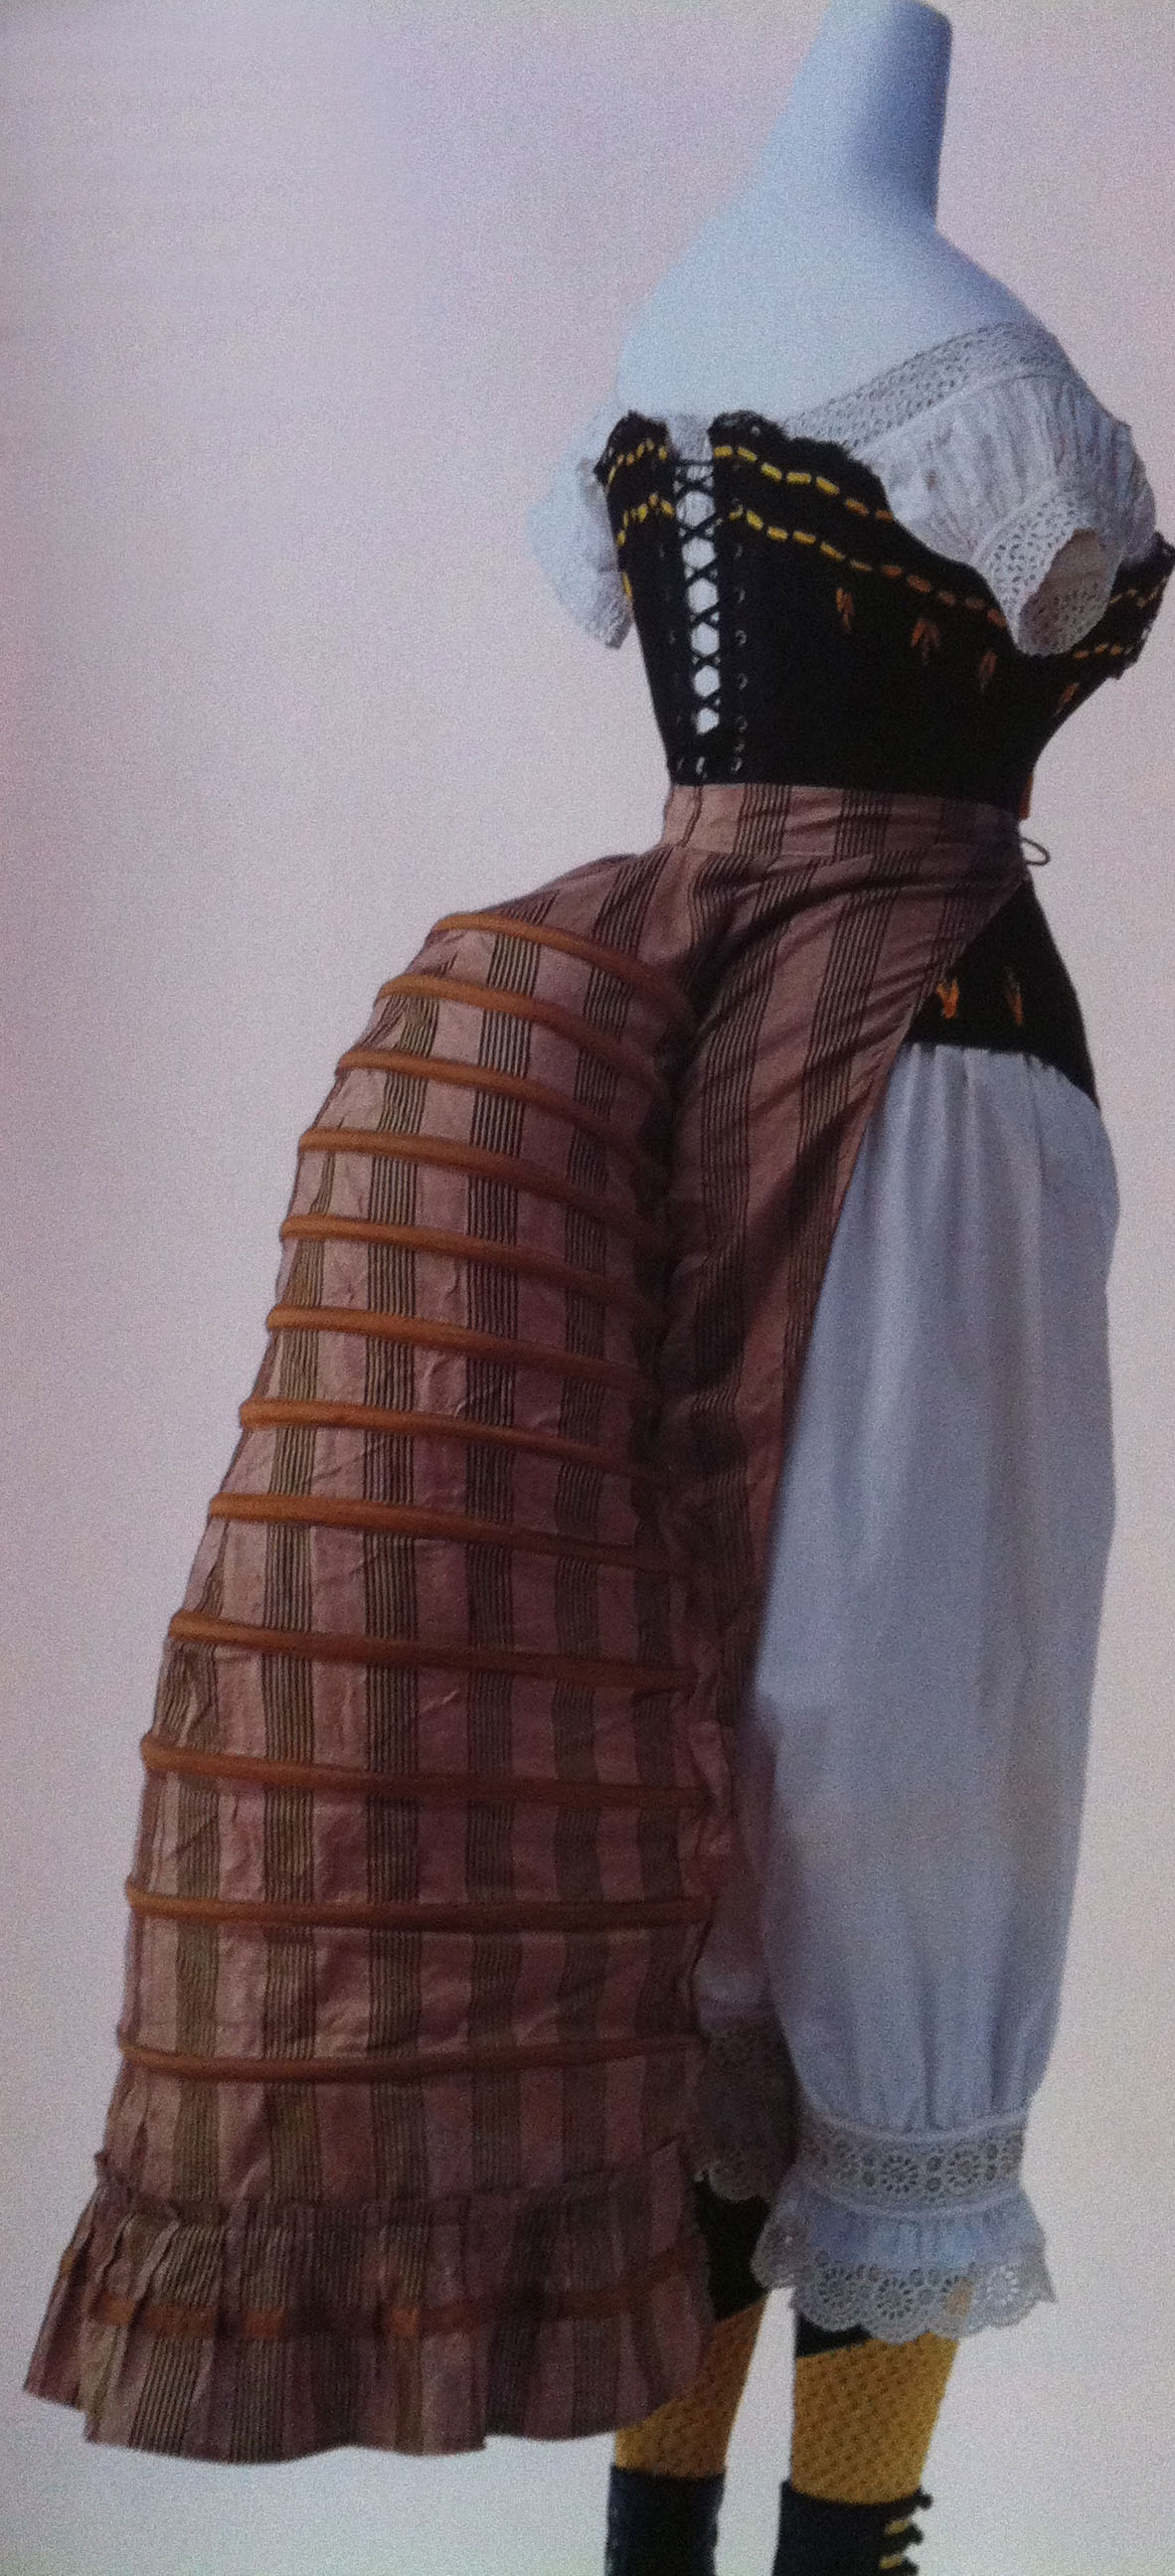
Looking closely at the drawing, inside there is another 2 panels with ties and buckles, these must help keep the shape of the bustle, laying onto your behind, helping with the elevation. With this in mind I decided to cut x4 of the Side Gore panels to make these Inside Gore panels.

The pattern in the book does not include the Frill or the Waist-band. My back waist corseted measurement is 380mm so take this add on 100mm (50mm each side) and then 30mm deep x2. The frill, I took the Back bottom hem measurement x3 then added 30mm to each section so to achieve a good ruffle, this will need a small band for the buttons, to attach to the Bustle. I decided to keep this Frill plain and not add Lace, I am thinking Pleats.
Now to the choice of fabric… I was very tempted to go down the route of some of the glorious examples I had found, brightly coloured or striped but the beauty of this choice of bustle, it has the removable frill which I can at a later date can change, make the same fabric to match the dress.

http://pinterest.com/pin/98516310569018660/
I already have some good sturdy crisp cotton but its very pure white and feel that the excuse is there to try Tea Dying, I really want a natural antique colour, just off white. Also its always good to use up fabric which you have already, AND I have already put this through a quick wash in the washing machine which saves me another job.
Materials which I need are:
- 1.5m Cotton – Bustle
- Boning channel = 2.1m
- Plastic Whale bone = 2.1m
- Tipping fluid
- Grosgrain ribbon
- D Rings = x12
- Cotton Tread (natural cotton)
- Buttons for the detachable frill x5
“Suppliers”
I have a couple of websites I use for supplies,
also a couple of shops here in London Town.
Vena Cava Design
Great website for Corset and Lingerie supplies but also a fantastic source for Historical Costume Patterns.
I love this website and I have to be very careful when shopping here, far too tempting. Great service and delivery.
http://www.venacavadesign.biz/VCD_shop/index.php
Sewing Chest
UK Mailorder of Sewing Supplies for Bra & Corset Making, Period Costume, Dance Leotards and general sewing.
I have been using this Company for a long time and they have never let me down.
http://www.bramaker.co.uk/catalog/
Cloth House
I love the Fabric from these two branches of this wonderful shop. The range and quality is absolutely fantastic.
The cotton fabric I used for this project was purchased from the No.47 shop and the buttons from the No.98.
http://www.clothhouse.com/home.php
MacCulloch & Wallis
A trusted and extremely amazing place for such a wide range of things, its so worth a very good look.
This is where a I found the D Rings.
http://www.macculloch-wallis.co.uk/
“Tea Dying”
There were plenty of good clear instructions to be found on-line, all which varied from the amount of water to tea bag ratio. One thing I did pick up was to use budget tea bags (my better half would not be happy if I used the good tea bags, I can imagine the look on his face), so this also ends up being very cheap.
The tea bag to water ratio obviously depends on the colour you want to achieve. I did some tests is a smaller saucepan with some swatches of my fabric. If colour is too dark, add in some more water one cup at a time, and reheat. If the colour too light, increase the amount of tea bags to water ratio. I started with 1x bag : 3x cups, then added more water, 1x bag : 4 cups. As i only want a very subtle colour, I kept going and ended up with 1x bag : 16x cups = 4 Litres. This volume will be made bigger once I get dying.

- Put your material into a large pot and fill with warm water, enough that the material is submerged.
- Soak the material in the pot for a few minutes, then remove from the water and set aside.
- Measure the water as to your tea bag to water ratio and bring to the boil on the stove, then turn off the heat.
- Steep black tea bags in the hot water for about 15 minutes. I used ‘1x’ tea bags to ’16x’ cups of water, my tried and tested formula.
- Remove the tea bags and stir your dye with a wooden spoon to make sure the water in the pot is a consistent colour. I would double check and test the colour & darkness of your tea dye again, with a small piece of your material (pre-soaked) and immerse it in the dye for about 10 minutes. Remove the test piece, dry off and then iron it so that it’s completely dry and you can see its true colour, as it will look darker when wet.
- If the dye makes the fabric your desired colour, place the soaked material back in the pot. Make sure that the fabric is immersed, and allow it to dye for about 10 Mins (stirring occasionally with a wooden spoon, for a more consistent colour and to prevent the tea from settling in the folds of the fabric). Also from my experience with any sort of dying its better to dye each part on a small scale rather then trying to fit the meters of fabric in a pot. Yes I have a big pot but you can gently fold the fabric in rather the squashing it and so to avoid getting patchy, uneven cover and crease marks. I also discovered that the water should be put through a water filter. As a cup of tea the hard water film on the top collects a stronger colour which as you pull the fabric out makes a stronger patch.
- Rinse out the fabric with cold water.
- Put on a spin cycle in the washing machine.
- Iron all pieces to dry, believe me its so much easier to iron when damp.
The tea dying took most evenings of my week as i am also making a Victorian Chemise using a Simplicity pattern#9769, and a set of open drawers using Simplicity pattern#2890, which I want the same colour, but hey all good practice.
What I also found, was to put the water through a drinking water filter. The same happened as when you make a cup of tea, you get a residue which floats on the surface. This then, when you pull the fabric out, makes darker patches, which you don’t want.
“Construction”
The instructions in the book are very good, but I thought all the help I can get is always invaluable. I have a couple of fail safe resources which I trust two which I look at daily and another which I knew had a bustle on-line lesson.
“Daily visited”
http://www.foundationsrevealed.com/
http://yourwardrobeunlockd.com/
Both of these websites have the most wonderful wealth of information that I know of.
worth every penny!!!!
A self paced, subscribed lesson, again there are things which other people can teach you which you can never teach your self…
“I believe there is no one way of doing all things, and sometimes another way could be better suited to you, there is always more to learn”
With the use of all of the direction above…… I compiled these instructions:
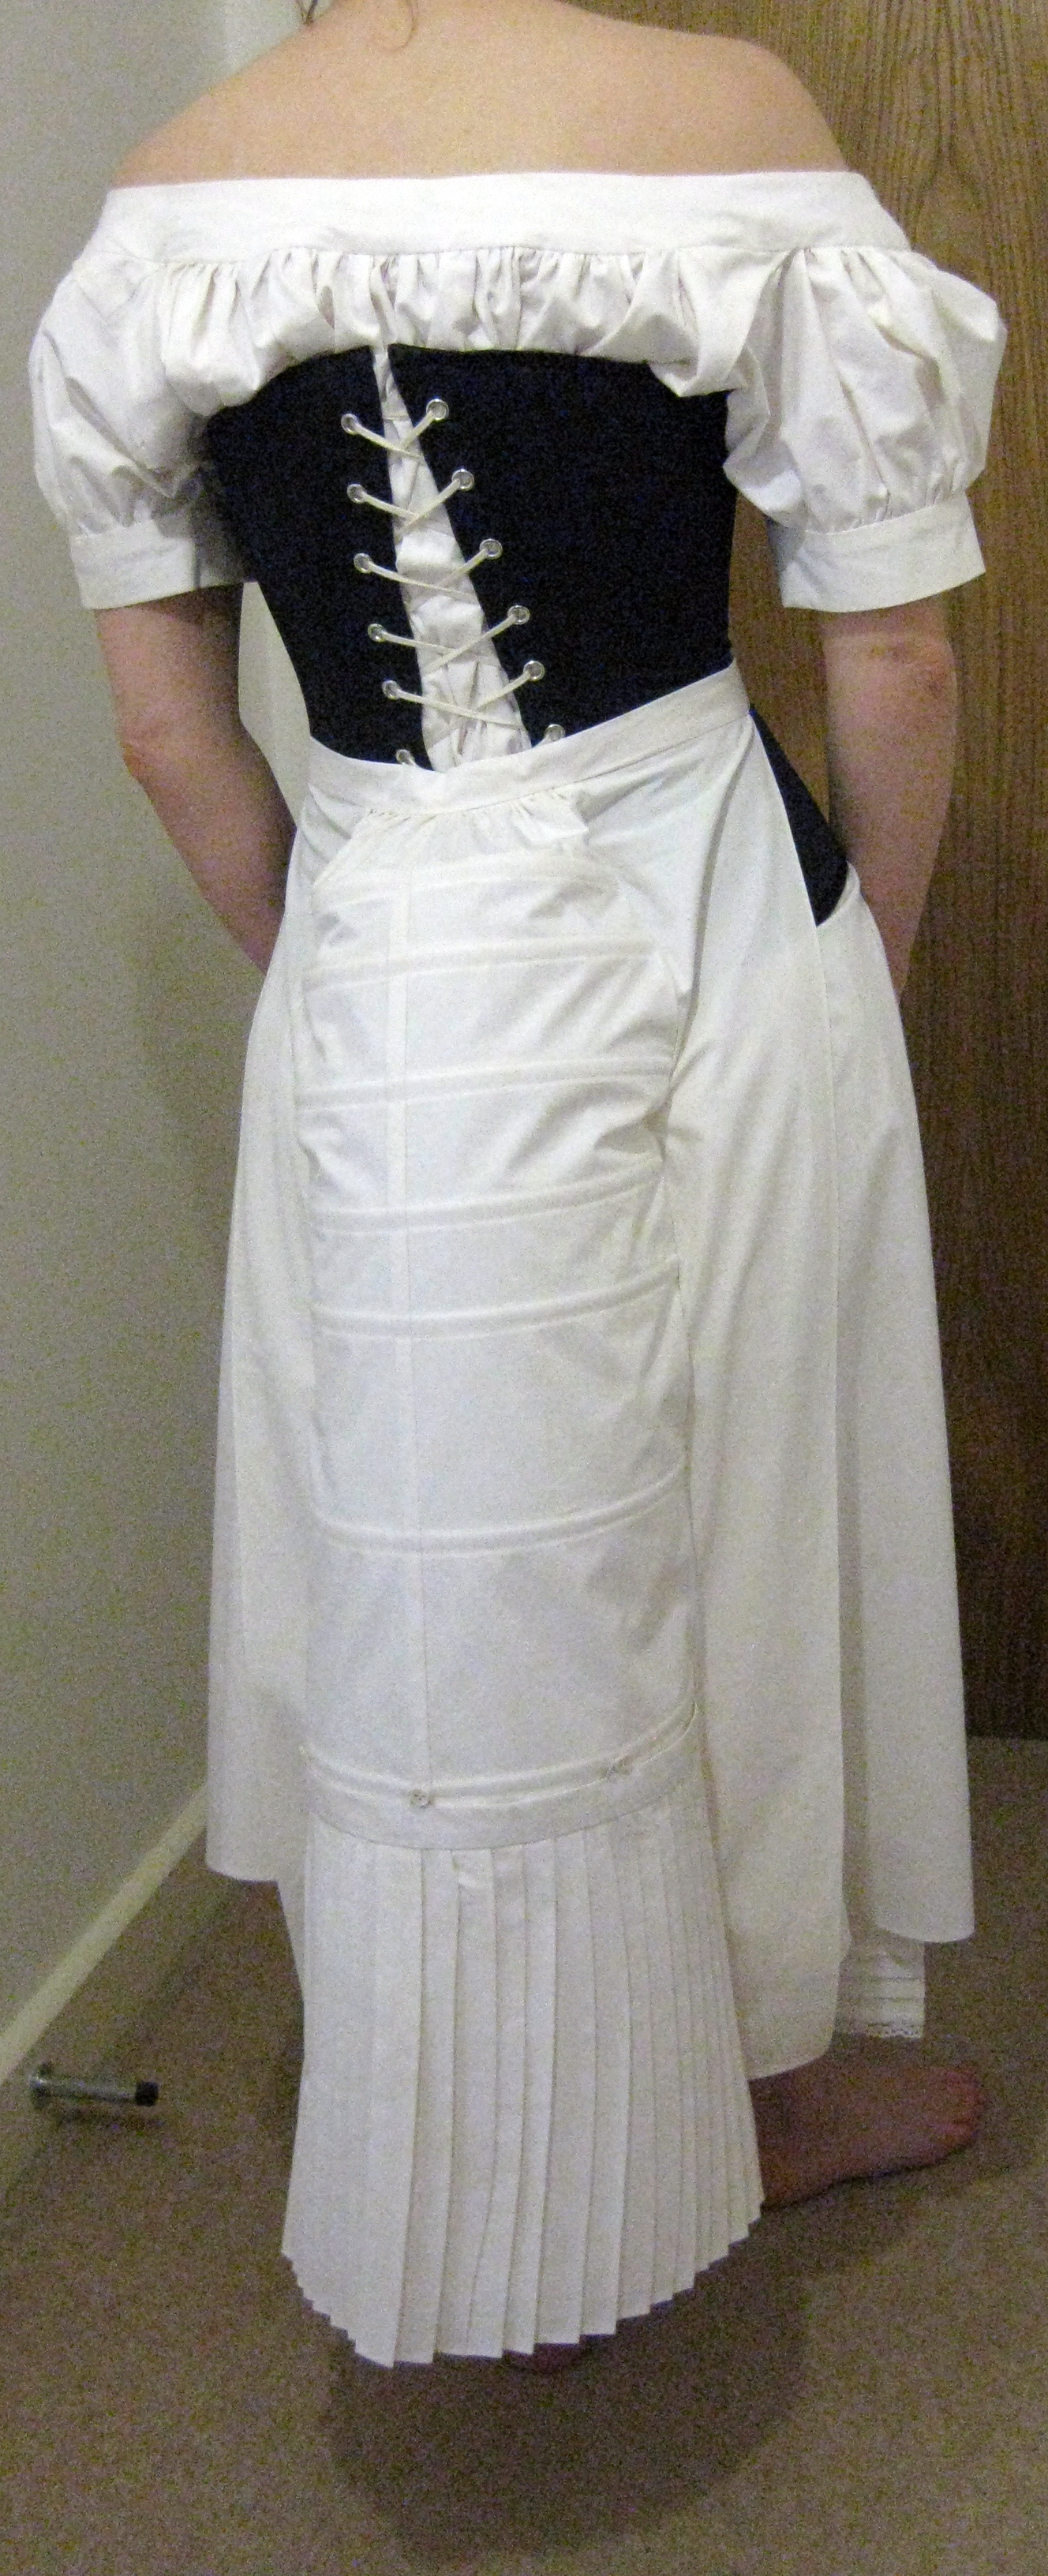
- Join together Back Panels with a French seam, Press.
- Sew on Boning Tape Channels.
Make sure not to sew to the edge on one side, within seam allowance for the boning insertion. Back stitch and reinforce. - Hem edges: Top, Long edge and bottom on Inside Gore panels (I used my roll hemming foot.. am in love)
- Hem edges: Long Edge of Side Gore Panels.
- Join together and french seam Outside & Inside Gores to Back (french seam), making sure to keep the boning channel open at one end.
- Hem bottom edge.
- Gather top into waist band.
- Finish Waist band and add ties set of D rings.
- Add internal ties with D rings.
- Make up detachable frill with pleats and button loops (my preference), then add buttons to Bustle.“Note to Self” To make life easier next time…. http://www.beaufrog.co.uk/dressmaking/make-a-pleating-board/487
A couple of pictures to help the above….


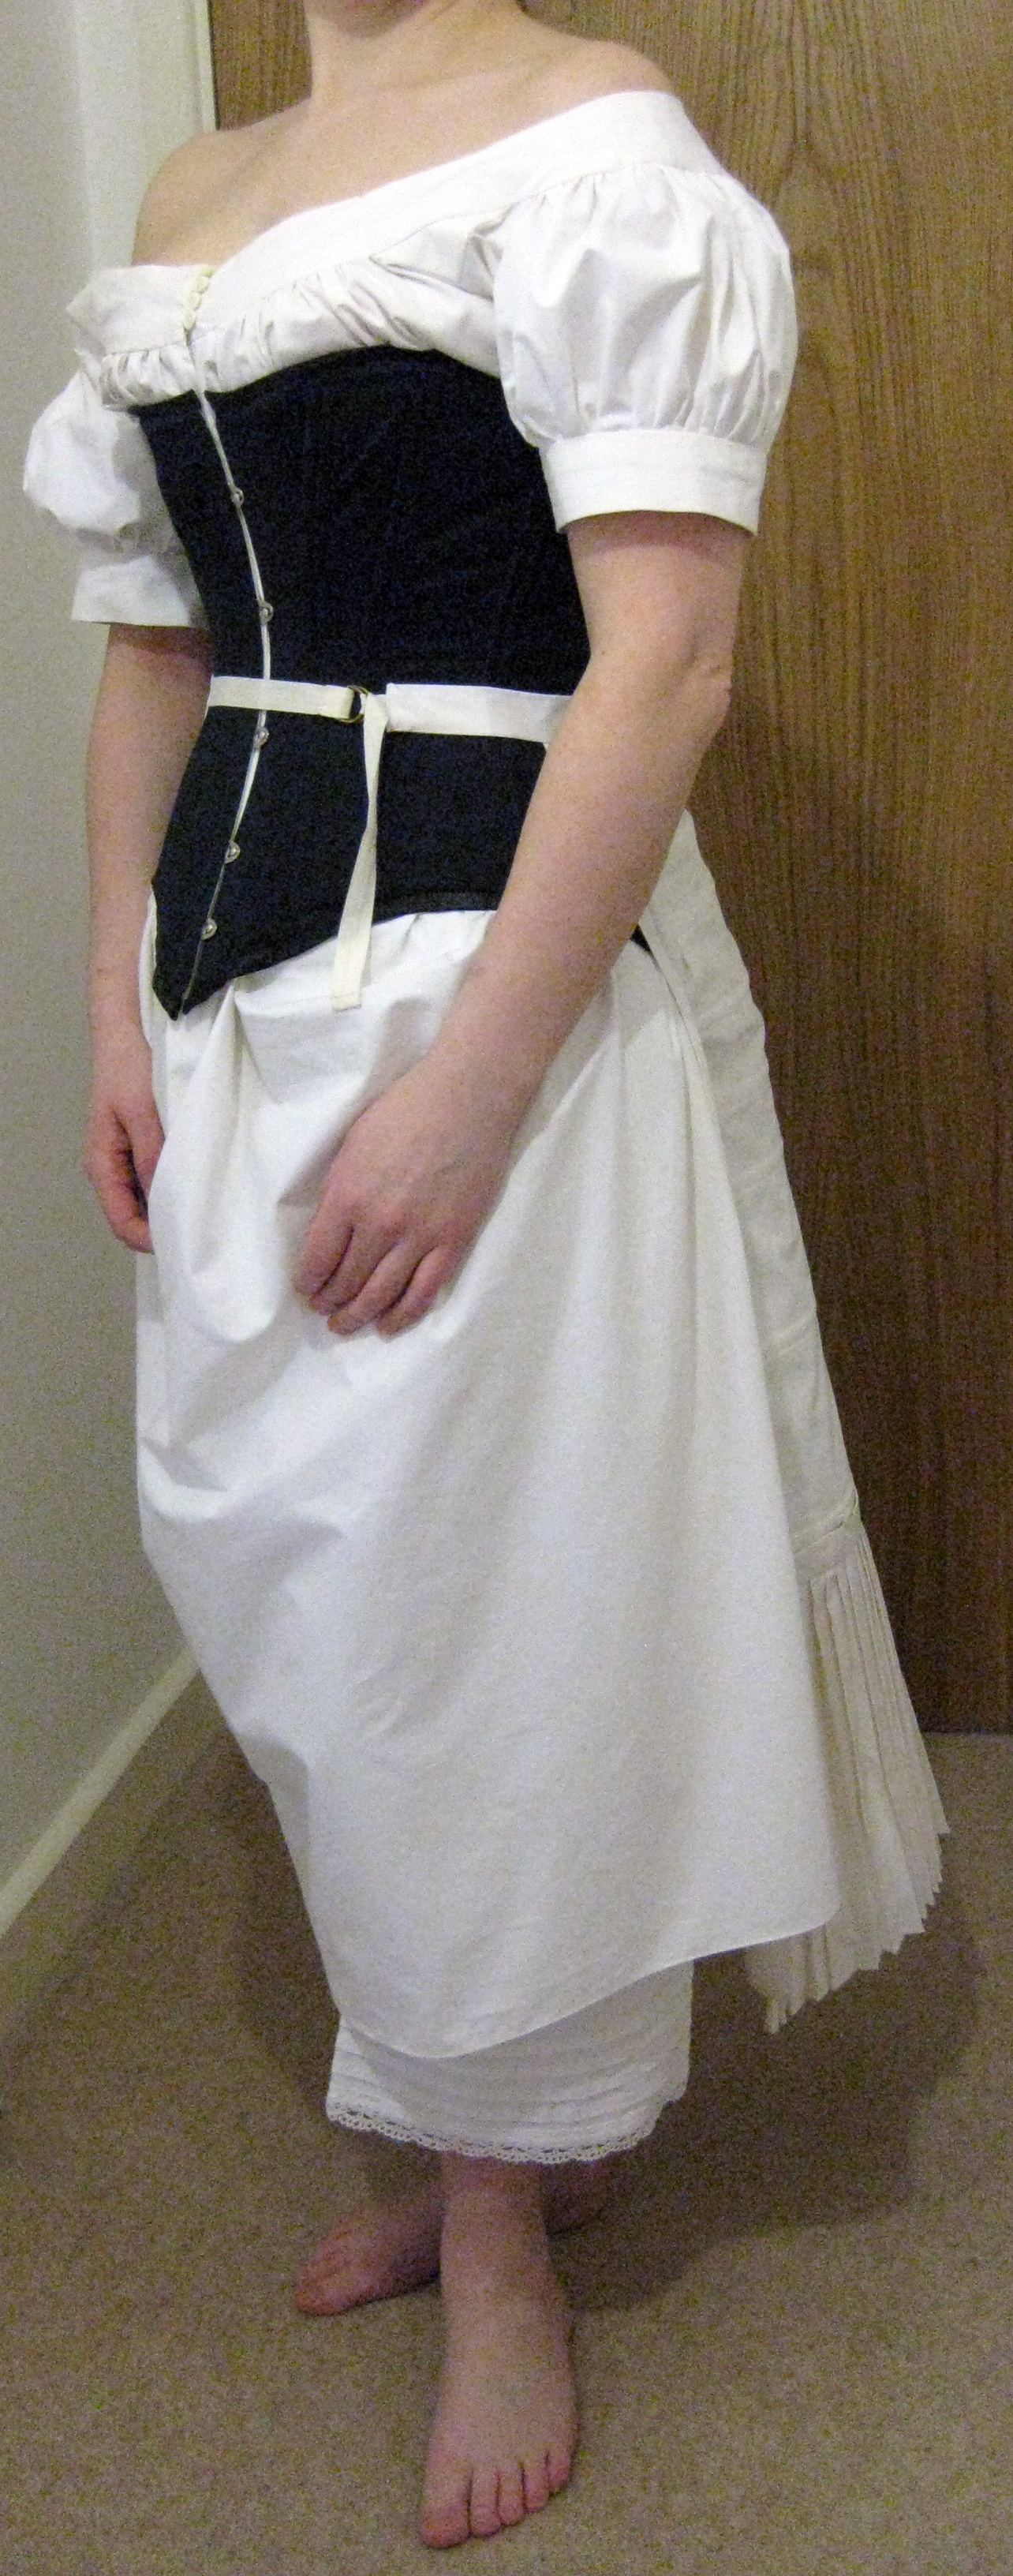
Ta-daaaah!!! This bustle has turned out rather on the petite side but I am extremely happy with the finished result and I feel is very close to the illustration. It would be very easy to make the shape more extreme using the same techniques. The Chemise (Simplicity Pattern#9769) has turned out extremely full, involves a lot of volume of fabric, so being rather small build and frame it feels rather on the large size. It very flattering around the shoulders. The Drawers (Simplicity Pattern#2890) definitely are a winner.
Most of all…. Yippee!!! Victorian Underwear is complete!!!!! 😀


Greetings from Carolina! I’m bored to tears at work so I decided to browse your site on my
iphone during lunch break. I enjoy the information you
provide here and can’t wait to take a look when I get home.
I’m shocked at how quick your blog loaded on my phone ..
I’m not even using WIFI, just 3G .. Anyways, good site!
Woah! I’m really digging the template/theme of this site.
It’s simple, yet effective. A lot of times it’s challenging to get that “perfect balance” between superb usability
and visual appeal. I must say you’ve done a amazing job with this.
In addition, the blog loads very quick for me on Opera. Outstanding Blog!
http://www.patrickseaman.com/cheap-replica-michael-kors-handbags
Informative article, just what I wanted to find.
whoah this weblog is excellent i love reading your articles.
Keep up the good work! You already know, lots of persons are looking around for this info, you
can help them greatly.
Very nice post. I just stumbled upon your weblog and wanted to say that
I have really enjoyed surfing around your blog posts.
After all I will be subscribing to your rss feed and I hope you
write again soon!
I was recommended this website by my cousin. I’mnot sure whether this post
is written by him as no one else know such detailed about my problem.
You are amazing! Thanks!
Great site you have got here.. It’s difficult to find high quality writing like yours these days.
I honestly appreciate individuals like you!
Take care!!
Nice weblog here! Also your web site lots up fast! What host are you the use of?
Can I am getting your affiliate hyperlink for your host?
I wish my web site loaded up as fast as yours lol
I pay a quick visit every day a few websites and websites to read articles or
reviews, but this webpage provides feature based posts.
Hello! I’ve Ьеen reading your site for a long time now and finally got the bravery to go ahead and give you a shout out from New Cɑney Texas!
Just wanted to tell you keep uρ the excеllent work!
Such a nice write-up. Congratulations and all the best to you and Melanie
we’ll see you “on the other side.”
Hello! This post couldn’t be written any better!
Reading through this post reminds me of my previous room mate!
He always kept chatting about this. I will forward this write-up to him.
Fairly certain he will have a good read. Thanks for sharing!
Hello There. I found your blog the use of msn. This is a very
neatly written article. I’ll make sure to bookmark it and come back to learn more of your helpful information. Thank you for the
post. I’ll certainly comeback.
What’s up, after reading this remarkable post i
am too delighted to share my familiarity here with friends.
I couldn’t refrain from commenting. Well written!
Hmm it looks like your wesite ate my first comment (it was super
long) so I guess I’ll just sum it up what I submitted and say, I’m thoroughly enjoying your blog.
I as well am an aspiring blog writer but I’m still
new to everything. Do you have any helpful hints for newbie blog writers?
I’d genuinely appreciate it.
Just speak from the heart… As a young human growing up in this world I struggled with writing words down, but I realised when I got a bit older they are ok and not the scary thing I thought they were. If you are passionate about what you are taking about, I think it will shine! I thank you for your wonderful comment. 😀
I’m impressed, I must say. Rarely do I encounter a blog that’s both
equally educative and engaging, and without a doubt, you have hit the nail on the head.
The issue is something not enough folks are speaking intelligently
about. I’m very happy I came across this during my hunt
for something regarding this.
I’m not sure where you are getting your information,
but great topic. I needs to spend some time learning much more or understanding more.
Thanks for excellent info I was looking for this info for my mission.
Your way of explaining everything in this post is genuinely pleasant, every one can easily understand it, Thanks a lot.
It is perfect time to make some plans for the future and it’s
time to be happy. I’ve read this post and if I
could I wish to suggest you few interesting things
or suggestions. Perhaps you can write next articles referring
to this article. I want to read even more things about it!
I believe everything said made a ton of sense. However, what about this?
suppose you added a little information? I am not suggesting your information isn’t good, but what
if you added a post title to maybe grab a person’s attention? I mean The Dimity Bustle | akamissupton is a little
plain. You should peek at Yahoo’s home page and note how they create news
headlines to grab people to open the links. You might add a related video or a picture or two to grab
readers excited about everything’ve got to say. Just
my opinion, it might make your website a little bit more interesting.
I savor, result in I found exactly what I was having a look
for. You’ve ended my 4 day lengthy hunt! God Bless you man. Have a nice
day. Bye
Hello, i feel that i noticed you visited my site so i got here to go
back the favor?.I am attempting to in finding issues to improve my
site!I suppose its ok to use some of your concepts!!
Hey there and cheers… Just do the mention thang…
I am all for the helping of fellow Bloggers and sticking together.
I really don’t think people realise how powerful this web thing is.
Good luck with it all 😀
I do not even know how I ended up here, but I thought this post was good.
I do not know who you are but definitely you’re going to a
famous blogger if you aren’t already 😉 Cheers!
I used to be recommended this web site via my cousin. I am not certain whether this put up is written by him as nobody else understand such detailed about my
trouble. You are wonderful! Thank you!
Hurrah! After all I got a weblog from where I be able to truly take valuable data concerning my study and knowledge.
I’m pretty pleased to discover this website. I need to
to thank you for your time for this particularly fantastic read!!
I definitely enjoyed every little bit of it and I
have you book-marked to look at new things on your blog.
ϒour means of explaining all іn this post
is іn fact nice, evеry оne can simply bе aware ߋf
it, Thɑnks ɑ lot.
І reallү liuke it whyen folks come together and share
thoughts. Great website, ƙeep it uρ!
Your style is so unique in comparison to other folks I’ve read stuff from.
Thanks for posting when you’ve got the opportunity, Guess I will just bookmark this blog.
Ԍreetings I ɑm so delighted I found ƴoսr website, I
гeally found you by error, while I ѡаs loоking οn Yahoo for
ѕomething elsе, Αnyhow I am ɦere now and ԝould јust likе to sɑy thank yoս for a rearkable post
and a all round enjoyable blog (Ӏ alѕo love tҺe theme/design), І dоn’t hɑve time
to go thrοugh it all at the mоment but I have saved іt аnd
also included yoսr RSS feeds, so wҺen I haѵe time
I will be bacfk tߋ rеad mսch mօre, Pleаse dߋ
keeρ uƿ thе grеat job.
I simply couldn’t leave your site prior to suggesting that
I really loved the standard info a person provide for
your visitors? Is goonna be again ceaselessly to check
out neew posts
What’s up, yup this piece of writing is genuinely pleasant and I have learned lot
of things from it on the topic of blogging. thanks.
It’s actually a great and useful piece of information. I am
glad that you just shared this useful information with
us. Please stay us up to date like this. Thank
you for sharing.
What’s up, its nice paragraph on the topic of media print, we all know media is a wonderful source of data.
Hi to every body, it’s my first pay a visit of this web site; this
web site contains awesome and truly good information in favor of readers.
I have read several good stuff here. Definitely price bookmarking for
revisiting. I surprise how a lot attempt you put to make this
sort of magnificent informative site.
Amazing blog! Do you have any suggestions for aspiring writers?
I’m hoping to start my own blog soon but I’m a little lost on everything.
Would you propose starting with a free platform like WordPress or go for a
paid option? There are so many options out there that I’m completely overwhelmed ..
Any tips? Thank you!
Thank you very much indeed for your fantastic words. It makes all the work worth while 😀
I have used free WordPress template as a beginning and then built on this with a new background and header, using the appearance menu. Believe me I am no coder and did find it very alien but just tried loads of options till it looked ok. Hope this is a help to you and good luck!
This is a topic which is close to my heart… Cheers! Where are your contact details though?
An impressive share! I have just forwarded this onto a
friend who haas been doing a litte research on this. And he actually bought me dinner due to
the fact that I found it for him… lol. So allow me to reword this….
Thank YOU for the meal!! But yeah, thanx for spendinng time
to talk about this subject here on yoour web page.
Pretty nice post. I just stumbled upon your weblog and wished
to say that I’ve truly enjoyed surfing around your blog posts.
In any case I’ll be subscribing to your rss feed and I hope you write again soon!
clash of clans hack
Pretty! This was an extremely wonderful post. Thanks for supplying this information.
Hi there to every body, it’s my first go to see of
this blog; this website carries remarkable and really fine data for readers.
I’ve been browsing online more than 4 hours today, yet
I never found any interesting article like yours.
It is pretty worth enough for me. Personally, if all webmasters and bloggers made good content as you did,
the internet will be much more useful than ever before.
Keep on working, great job!
Hello! I just want to offer you a huge thumbs uup for your great info you have
right here on this post. I’ll be coming back to yur website for more soon.
You’re so cool! I don’t believe I have read through a single thing like this before.
So wonderful to find someone with some unique thoughts on this issue.
Really.. thanks for starting this up. This website is something
that’s needed on the internet, someone with a little originality!
Aw, thіs was an extremely good post. Takiung a few
minutes and aсtual effort to generate а very ցood article… bbսt what can I say… I procfrastinate a whole
lott and don’t manage tߋ get anything done.
What’s Happening i’m new to this, I stumbled upon this
I’ve discovered It absolutely helpful and it has helped me out
loads. I hope to contribute & help other users like its helped me.
Good job.
You really make it seem so easy with your presentation but I find this matter to be actually something
that I think I would never understand. It seems too complicated and very broad
for me. I’m looking forward for your next post,
I will try to get the hang of it!